Help Guide
Use the builder to create MAME `.lay` files or RetroArch overlay exports.
This guide covers the current workflow for building a layout from scratch, importing an existing `.lay`, attaching artwork, using lock mode, checking alignment in the preview, using the layer stack, and exporting the active MAME or RetroArch output.
The builder creates MAME `.lay` XML and RetroArch `.cfg` output in the browser, previews bezel and artwork placement, supports H2H and secondary-display layouts for MAME, and can also merge bezel layers into a RetroArch-ready overlay image.
Overview
Layout and controls
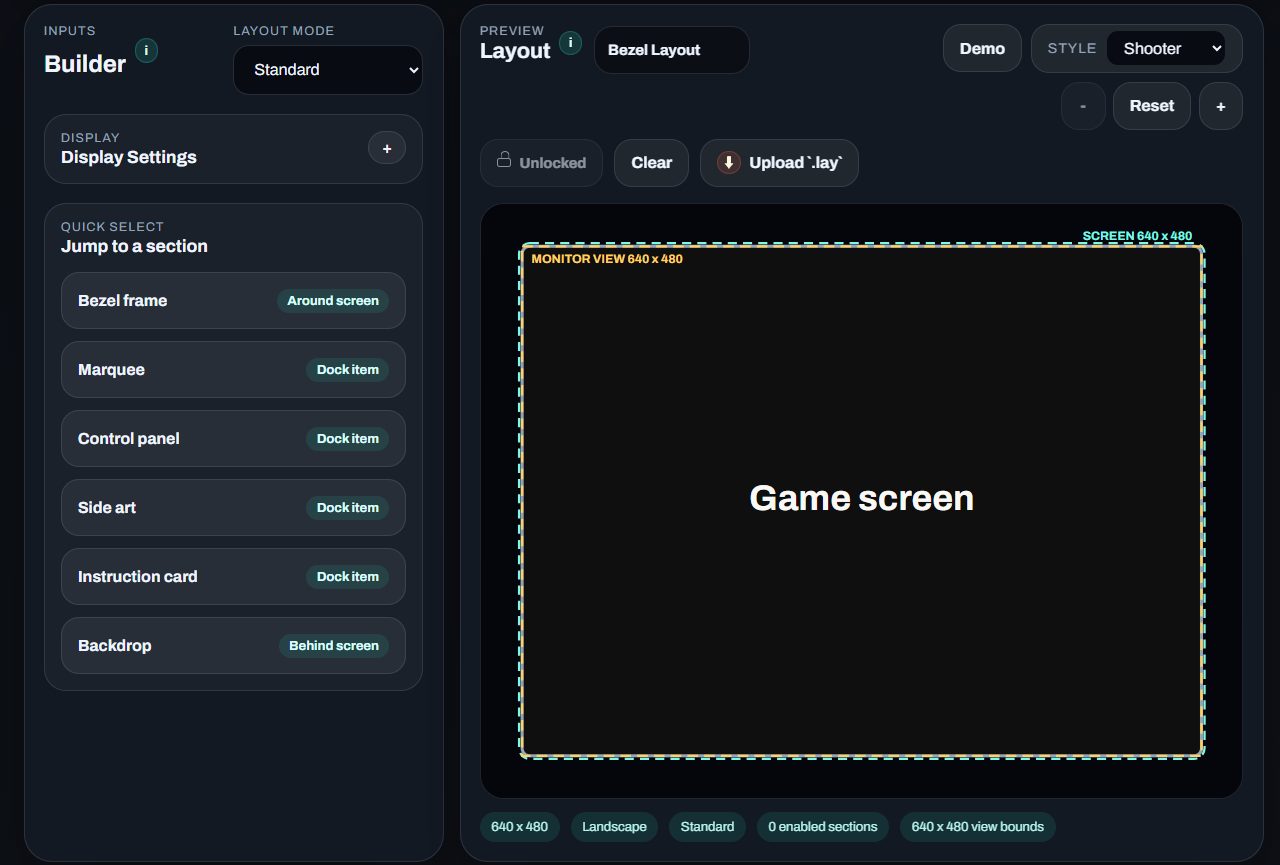
- Use the left panel to work from the collapsible `Display Settings` box and the quick-select tools menu.
- The preview header now shows `Layout`, an editable layout name field, Demo, Style, zoom controls, Lock, Clear, and Upload `.lay`.
- `Full Preview` opens the merged image fullscreen for an output-style check, while `Full Demo` opens the live gameplay demo in the same fitted fullscreen view.
- In Secondary Display mode, the preview also adds `Display 1`, `Display 2`, and `Full view` tabs so you can inspect each monitor separately.
- The `Stack` button in the left panel opens the layer stack without hiding the rest of the builder.
- Use the Output panel to copy or download the active mode output. MAME modes show `.lay`; RetroArch mode shows `.cfg`.
- The summary pills under the preview show the current display sizes, enabled sections, and view bounds.
Start by setting the monitor size first. That gives you a stable preview boundary before you begin placing artwork. Use the Home button on the builder page to return to the landing page, and the Help button to reopen this guide at any time.
Manual Build
Create a layout from scratch
- Turn on only the sections you want to use, then open them from the quick-select menu.
- The main bezel layer includes Width, Height, X, Y, layer order, Rotation, and artwork tools. In RetroArch mode it also includes per-layer opacity and overlay scale.
- Extra bezel layers can be added from the bottom of the bezel section and each one has its own enable toggle, label, image, XML element name, size, X/Y, and rotation. RetroArch mode adds per-layer opacity and overlay scale there too.
- Marquee supports width, height, X, Y, rotation, and layer order.
- Control panel, side art, instruction card, and backdrop all support X, Y, and layer order so they can be nudged into place.
- Default layer values start at Main bezel 20, Marquee 10, Control panel 8, Side art 6, Instruction card 4, and Backdrop 2.
If a bezel image is loaded, the builder can auto-detect a visible gameplay window or fit one as a fallback. Use the viewport fields to fine-tune the result if needed, including negative X or Y values when you want the gameplay area to sit beyond the layout origin. Main bezel X and Y move the bezel artwork only, while the viewport stays separate until you adjust it manually or re-run Auto-detect viewport. In Standard mode, quick-menu artwork items now follow the same fixed monitor-boundary idea, so pushing them beyond the screen edge crops them visually instead of shrinking the whole layout.
H2H Cocktail
Use two gameplay windows in one layout
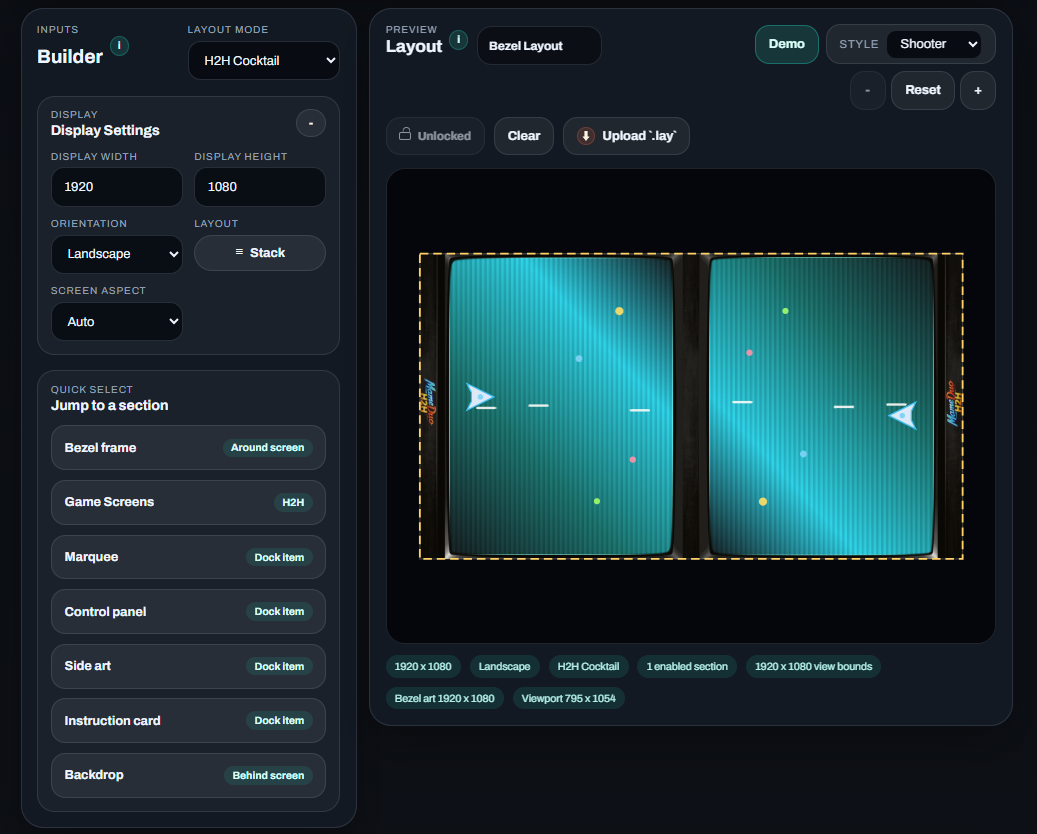
- Choose `H2H Cocktail` when one layout needs two gameplay windows for opposing players.
- Open `Game Screens` from the quick menu to edit both gameplay windows inside one tools view.
- Screen 1 placement and Screen 2 placement each support X, Y, Width, Height, and Rotate.
- When a two-window bezel is loaded, Auto-detect viewport refreshes both gameplay windows instead of only screen 1.
- The preview and demo both respect screen rotation, so you can check top and bottom player orientation visually before export.
- The exported `.lay` writes the H2H screen orientation values into the XML when rotation is used.
For H2H work, load the bezel first, then use Auto-detect viewport to capture both windows before you start fine-tuning screen 1 and screen 2 manually.
Secondary Display
Use a second physical monitor
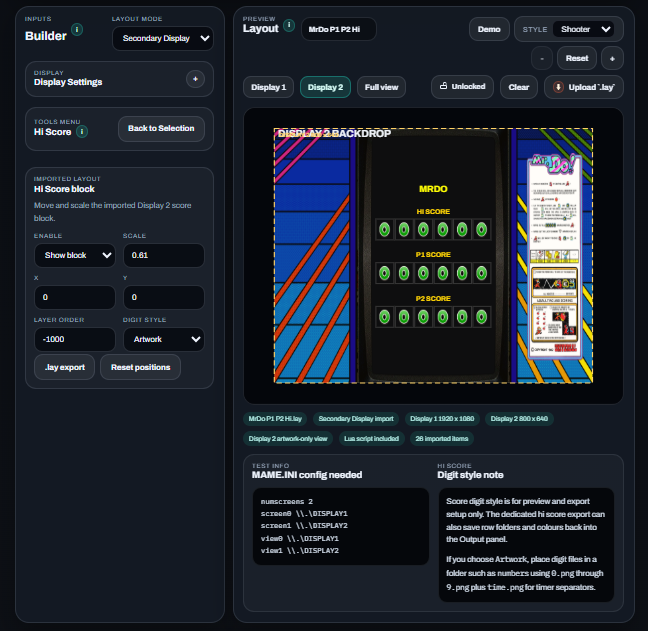
- Choose `Secondary Display` when you want gameplay on one monitor and artwork such as a marquee on another.
- Use the top `Display Settings` box to open the combined `Display 1 placement` and `Display 2 placement` controls.
- `Display 1 placement` controls width, height, orientation, and aspect for the gameplay monitor.
- `Display 2 placement` controls width, height, orientation, and which side the second monitor sits on.
- Use the `Display 1`, `Display 2`, and `Full view` tabs in the preview to inspect each monitor separately or both together.
- Display 1 and Display 2 keep their own artwork targets, so a bezel can stay on display 1 while a marquee or other item is attached to display 2.
- Open artwork sections from the quick menu while the desired preview tab is active, or use the item target dropdowns, so non-bezel items stay on the display you are editing.
- Display 2 also has its own bezel tools and extra bezel-layer flow, so you can build a dedicated second-screen artwork stack when needed.
- The exported `.lay` creates separate views named `\\.\DISPLAY1` and `\\.\DISPLAY2` for MAME multi-monitor output.
For MAME, set `numscreens 2`, `screen0 \\.\DISPLAY1`, `screen1 \\.\DISPLAY2`, `view0 \\.\DISPLAY1`, and `view1 \\.\DISPLAY2` in your MAME configuration so each physical monitor uses the correct generated view. In this mode, the preview should be treated as separate display-targeted views, not one shared spill-across-both-screens artwork space.
RetroArch
Use the dedicated RetroArch workflow
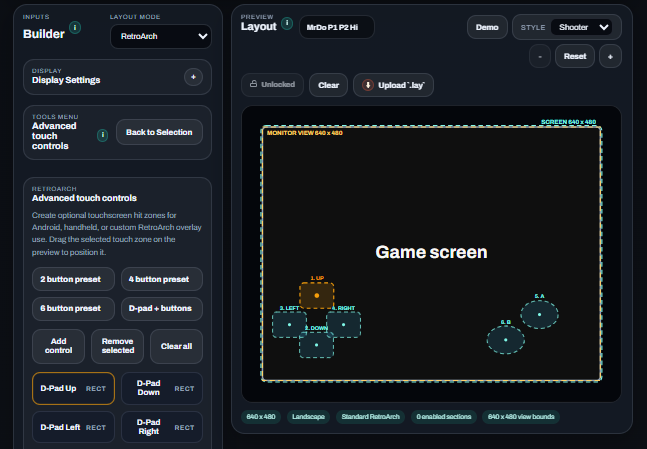
- Choose `RetroArch` in Layout mode when you want a bezel-focused overlay workflow instead of a full MAME layout editor.
- RetroArch mode hides the non-bezel artwork sections and keeps the builder focused on the main bezel layer plus extra bezel layers.
- `Global Overlay Settings` controls the overall RetroArch overlay opacity, scale, rotation, and shader.
- The main bezel layer and extra bezel layers each support their own opacity, overlay scale, and rotation controls for per-image tuning.
- `Advanced touch controls` lets you build optional touchscreen hit zones with presets, drag-to-move positioning, and exported `overlay0_desc*` entries in the `.cfg` using normalized full-screen coordinates.
- The custom touch-mapping flow can store a user label plus a raw RetroArch command for special actions such as save state, load state, rewind, menu toggle, or screenshots.
- The merged preview export uses the current display size and bakes the visible bezel composition into a PNG for RetroArch.
Think of RetroArch mode as a focused overlay builder: one merged PNG plus one `.cfg`, rather than a full multi-view MAME layout. Global overlay opacity stays in the `.cfg`, while per-layer opacity stays baked into the merged bezel image. If the overlay looks too strong or too faint in RetroArch, check the global overlay opacity first, because that is the final fade applied on top of the baked PNG.
Layer Stack
Adjust draw order visually
- Use the `Stack` button in the left panel to open the current layer stack without losing the preview.
- The stack lists active items and their current layer numbers for the current view.
- Use the up and down arrows to change layer order visually while watching the preview update on the right.
- Lower layer numbers should appear above higher numbers and above gameplay when they are below gameplay layer 50.
The stack is a convenience editor for the same Layer order values shown in each card, so you can work visually instead of jumping between many element cards.
Import
Import an existing `.lay` file
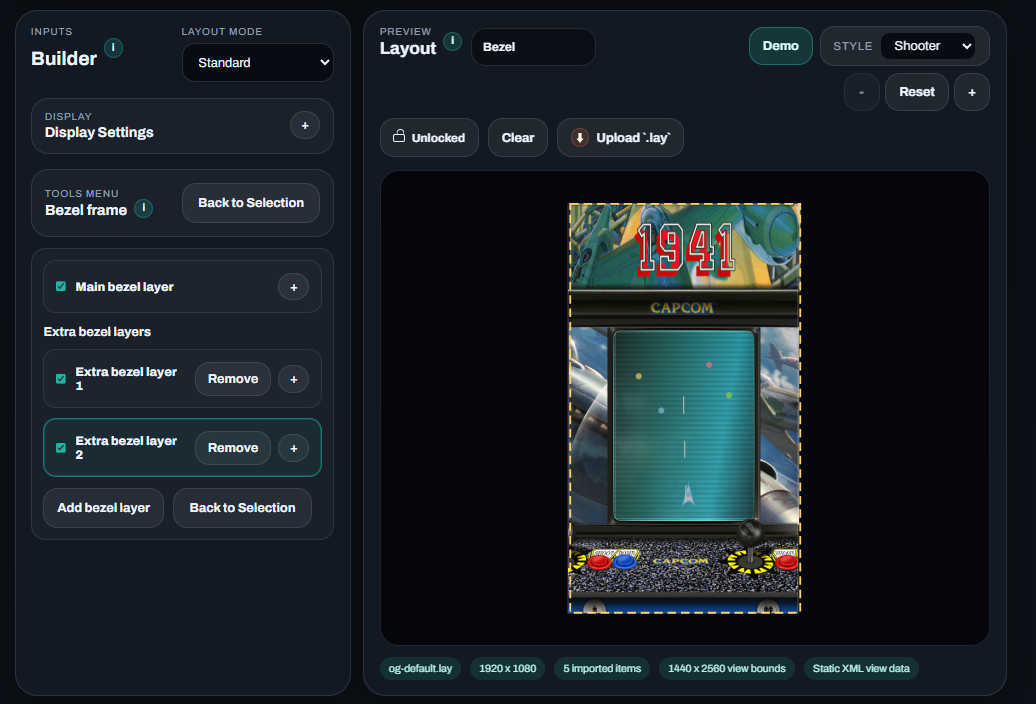
- Use Upload `.lay` to import an existing layout into the real editor.
- Imported main bezel details appear in the main bezel layer fields.
- Imported extra bezel layers are rebuilt as editable layer cards in the bezel section.
- Imported image references appear as placeholders until you upload the matching artwork image files.
- Imported items show a small import icon so you can see what came from the uploaded file.
- The importer supports both main bezel styles: `
` and large image-based ` ` entries. - Imported secondary-display score layouts can expose a `Hi Score` quick-menu item so the imported score cluster can be shown, moved, scaled, layered, and written back into the exported `.lay` as one grouped block.
- The imported `Hi Score` tools also support a dedicated `.lay export` flow for row-specific digit folders and saved colours when you need a separate hi-score artwork export.
- Imported standard `.lay` files with local refs such as `Glass`, `Bez`, `Bezel`, or `Marquee` now update those same element definitions in place when you reattach artwork through the builder.
When a `.lay` is imported, the builder locks the layout settings by default so you can attach artwork files without accidentally changing the imported measurements. Imported output is then rewritten from the live builder state, pretty-printed for easier reading, and reflected in the exported `.lay` instead of only staying in preview.
Lock Mode
Lock or unlock the layout
- Lock mode is available for both manual layouts and imported layouts.
- When locked, measurement fields stay frozen but artwork upload actions remain available.
- Unlock when you want to change geometry such as viewport size, screen aspect, or item dimensions.
- Imported `.lay` files start locked by default, but can still be opened in the quick menu so artwork can be attached before unlocking.
- After unlocking, Screen aspect refits from the original imported viewport area rather than shrinking repeatedly.
- Imported secondary-display layouts can also expose `Hi Score` block controls once unlocked, so grouped imported score overlays can be repositioned without editing each digit or label separately.
- The `Hi Score` tools-menu `i` button stays available while locked, so the grouped score-block and digit-artwork notes can still be opened without unlocking first.
A good workflow is: import or build the layout, lock it, test artwork files, then unlock only when you need to change geometry.
Preview
Check alignment in the preview
- The yellow dashed outline shows the monitor boundary.
- The cyan dashed outline shows the gameplay screen boundary.
- The preview scales proportionally to match MAME-style fit behavior.
- In Standard mode, artwork moved beyond the yellow monitor boundary should crop against the fixed display edge instead of making the whole preview refit smaller.
- If artwork aspect does not match the physical monitor, the preview shows the same black gap behavior you would expect in MAME.
- Use `+`, `-`, or mouse wheel to zoom the preview.
- When zoomed in, right-click and drag the preview to pan to the area you want to inspect.
- Reset returns the preview to the normal centered view.
- Demo mode can show a moving sample scene for visual reference inside the gameplay area.
- `Full Preview` uses the merged image so you can check the exact fitted output, including portrait-on-landscape monitor cases and black side gaps when aspect ratios do not match.
- `Full Demo` uses the same fullscreen fit rules but keeps the live gameplay demo visible inside the viewport.
- The yellow monitor boundary now stays visible on top so you can always see the real physical display edge.
- If an item does not appear in the preview, check its Layer order first. Lower numbers draw above gameplay, while higher numbers move behind it.
Export
Save or copy the result
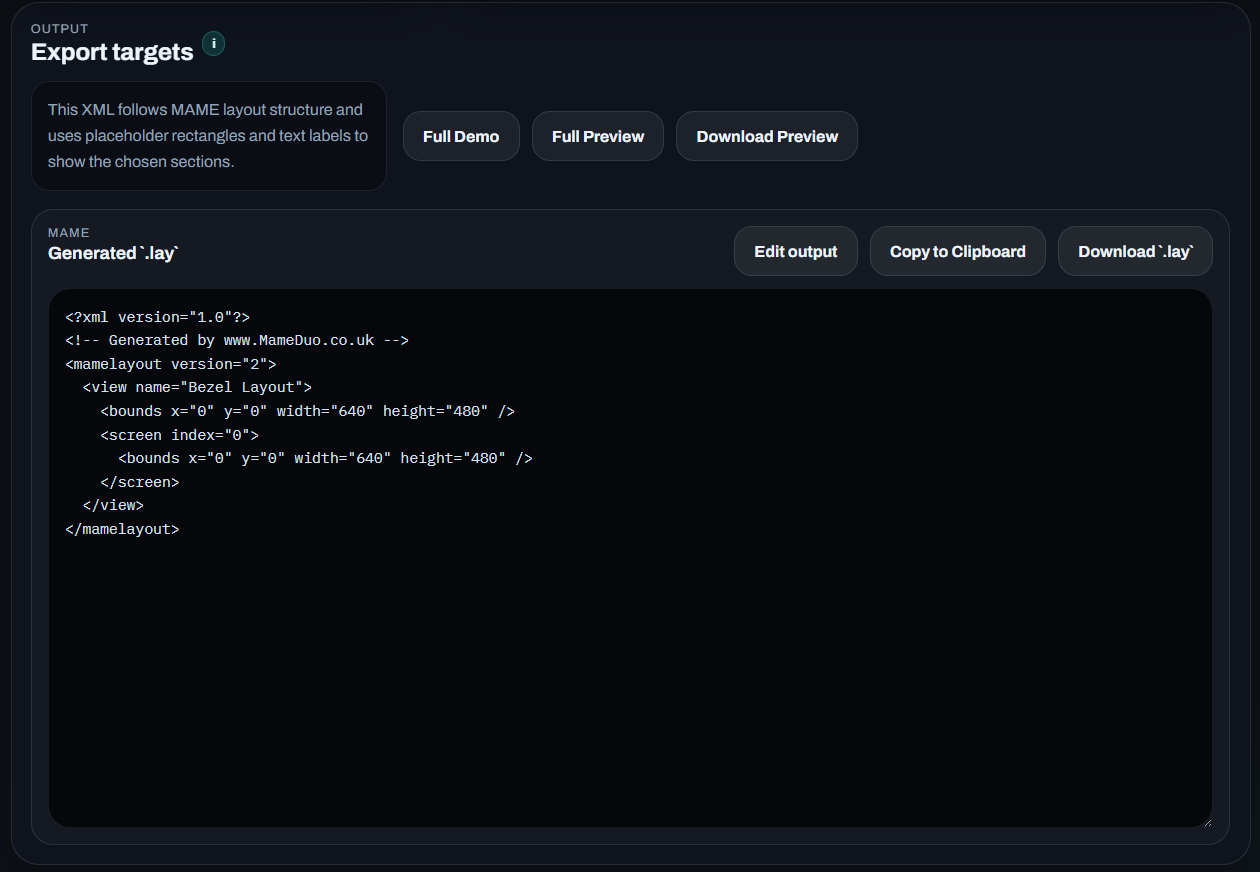
- Copy to Clipboard copies the active output shown in the Output panel.
- In MAME modes, Download saves the current `.lay` file.
- In RetroArch mode, Download saves the current `.cfg` and merged overlay image.
- Download Preview always saves the merged preview image using the current artwork composition.
- `Edit output` unlocks the active XML or CFG text for manual edits inside the panel, and `Update output` applies those changes before copy or download.
- Referenced image filenames are written directly into the XML when artwork is loaded or imported by reference.
- Keep the exported `.lay` file in the same MAME artwork folder as the PNG files it references.
- Secondary Display export also writes separate MAME views for `\\.\DISPLAY1` and `\\.\DISPLAY2`, plus a `Full View` reference view.
- When an imported `.lay` stays active, the output panel shows a rewritten version of that imported file so supported builder changes such as imported hi-score block movement and added bezel/background elements are reflected in the export.
If you want an offline version of this guide, use the PDF link at the top of this page.